Pages

Monday, September 20, 2010

MS-Exchange WebDAV authentication on clustered environment

What is NLB (Network load balancing) clustered environment?
 
Clustered environment is not a single server; it is the virtual address of NLB cluster which is comprised of our CAS and HT Exchange server nodes (In case of Exchange server cluster).
When Windows NLB has been properly configured, all servers in the NLB cluster are represented by a single virtual IP address and by a fully qualified domain name (FQDN). When a client request comes in, it will be sent to all servers in the Windows NLB cluster. The client will then be mapped to a particular server and the request to the other servers will be dropped. It means to say that, you can use affinity to direct specific client request to particular member servers. You can even configure each member server with a priority.

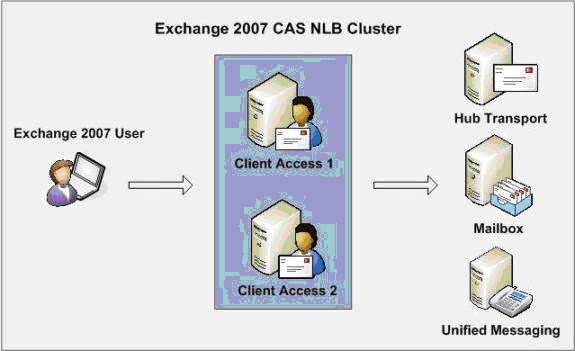
Figure below shows a very simple setup consisting of two Exchange 2007 Client Access servers configured in a Windows NLB. Both Client Access servers accept the client requests and send them to the respective back-end servers depending on the type of request.

For Example: When we go to https://exchange.portmail.com/owa, the login page is provided directly to you by either of our CAS/HT nodes. There are no redirects for CAS/HT traffic.

When we create any request for cluster, the cluster takes this request and forwards it to front servers (In case of Exchange, it is CAS (client access server) server). Now front servers handle the request and pass it on required mail box.

Exchange WebDAV Cluster connection construction when Exchange and Mailbox users in different domain

In some cases, Exchange users and Mailbox users belong to different domains and may be in different machines as well.

For Example: Your Exchange user belongs to ‘staff.ad.portmail.com’ and Mailbox users belong to ‘portmail.com’.

For this environment, if you want to establish connection with Exchange server using WebDav protocol, you need to keep following things in your mind. These are,
1)  If Exchange user belongs to parent node, Exchange user comes with parent domain let’s say ‘staff.ad.portmail.com\\utest2’ else it belongs to child node depends on Exchange configuration.
2)  If Mailbox user belongs to child node, Mailbox user comes with child domain let’s say ‘utest2@.portmail.com’ else it belongs to parent node depends on Exchange configurations.
3)  In each connection call, if Exchange server is configured with FBA (Form based authentication), we receive FBA cookie each time whether it is right call or not.  As of my understanding,

Right cookie is as,
fbaCookie :sessionid=aecf3dac-0666-4cfd-b44d-2eb8eb9d01a7; cdata=1ahtoUs9q7ak1MUcDlGkScTjyTzCu9H66h3C773lTKg2mq7Kpt6uMxNAl5DamkGCmG3UDmMa0KkeLTEKOItTNrF/H4vKf3TMip/l5vg==
 - Starts from characters

Wrong cookie is as –
fbaCookie :sessionid=45f6a15a-d323-411e-91fe-6607e2106cd7; cdata=1UuQOsRhVdWkf08JG1FANQllsWgvVCLsHy5nciGMLd/3+AoIEvF0ligBSZGEm58QD3rUzNx7UPku94S+9yFW/Ww==
-  Starts from numbers.

Exchange WebDAV FBA authentication

This cookie returns once you authenticated with Exchange server and you can find this from authenticated response. This cookie contains sessionid and cadata both. You need to pass this query for each Exchange operation (Basically for authentication).

Reference Taken From - 
http://www.redline-software.com/eng/support/articles/msexchange/2007/load-balancing-exchange-2007-client-access-servers-windows-network-technology-part1.php

Wednesday, March 10, 2010

SSL configuration on clustered environment of Exchange 2007 server

By default, Exchange 2007 server is SSL enabled and to disable the SSL settings are very simple. If you want to disable the SSL settings of Exchange server, one can go through one of our post s which describe how to disable the SSL configurations from Exchange 2007 server.

In order to describe the SSL configuration on Exchange 2007 server on clustered environment, it is not an easy for one because in clustered environment Exchange server does have distributed servers for managing the request.

First of all, one would like to describe the clustered environment of Exchange server which have CAS servers, Edge transport servers (ETS), Hub transport servers (HTS), Active directory servers, Exchange mailbox server clusters and public folder cluster.

Basically, when one create any request for Exchange server, the request comes at CAS (Client Access Server (OWA)) servers  first and through ETS and HTS, Exchange server passes the request to Mailbox server clusters and provide access for Mailbox resources.

Now, one is taking a scenario or you can say requirement. The requirement is, one do not want to configure SSL on Exchange mailbox clusters. One wants to configure the SSL for CAS servers since these servers handle the client requests.

In this case, one makes all CAS servers SSL enabled and disabled the SSL settings on Mailbox server clusters since Exchange is SSL enabled by default. Now, when request sent by the client for Exchange server, it handle firstly from CAS servers which all should be SSL enabled, then pass the request to Mailbox server clusters for accessing mailbox resources.

Monday, February 15, 2010

Exchange 2003 & 2007 Mailbox sharing

One has a task to share a mailbox in sales department. Most likely, one just created a mailbox enabled user account in active directory and adds other users for providing the mailbox permissions. These users belong to sales department. In this way, security department can take advantage of this enabled mailbox.
Basically, this process is not secure. This article describes how Exchange team solves this issue and makes it more secure in latest version of Exchange Server.

Exchange 2003 Mailbox sharing
Firstly, one describe the shared mailbox creation for Exchange 2003 which has the enabled user account in Active directory and Exchange 2007 which has disabled user account in Active directory.
In Exchange 2003, one can create new mailbox user using one of our Post Exchange 2003 mailbox creation.
One can add the mailbox permission by following ways. These are,
  1. Click on mailbox user property which brings up the properties portion of user. Now click on ‘Exchange Advance’ tab. See Figure 01


Figure 01: This shows the mailbox user property
  1. Now click on Mailbox Rights button which brings up the mailbox permission window. See Figure 02.
Figure 02: This shows the mailbox permission for user.
  1. Now, one shares this mailbox for any other mailbox enabled user. Click on Add button for adding mailbox user which is enabled in Active directory. See Figure 03,
Figure 03: This shows sales mailbox is shared with dilip.
  1. Now one adds ‘Full mailbox access’ for ‘dilip’ user and the mailbox ‘sales’ is shared with ‘dilip’. See Figure 04,
Figure 04: This shows dilip has full mailbox access.

Exchange 2007 Mailbox sharing
In Exchange 2007, one can create new mailbox user using one of our Post Exchange 2007 mailbox creation.
The mailbox in Exchange 2007 has disabled user which doesn’t has password and in this way one can provide sharing permission for other users. This is more secure than Exchange 2003 since one does not use enabled user which can be traced by security department. In case of Exchange 2003, this is very rare to know about username and password both and what happen when the mailbox user left the organization? This kind of issue does not occur in Exchange 2007.

In Exchange 2007, one can not create the shared mailbox using ‘Exchange Management Console’. One can create using ‘Exchange Management Shell’.

Please use following steps for creating shared mailbox. These are,

One creates a disabled user account in the ‘Users’ organizational unit since the user is disable so one does not require password. The command is,

[PS] C:\Documents and Settings\Administrators>New-Mailbox -Name:'sales' -OrganizationalUnit:'portmail.com/Users' -Database:'Mailbox Database' -UserPrincipalName:'sales@portmail.com' –Shared

This command creates shared mailbox user named ‘sales’.

Now one needs to assign permission for other user.

[PS] C:\Documents and Settings\Administrators>Add-MailboxPermission sales -User:'dilip' -AccessRights:FullAccess

This command provides full access rights for sales mailbox user. One suggests assigning permission on Security Group instead of single user. One can create the Security Group from one’s domain containing the shared mailbox and the users belong to this group has full access of mailbox.

In this way, one can not assign the full access for ‘User / Security Group‘. One must add ‘Send-As’ permission so that user or users belong to the group can send mail to the shared mailbox mail address.

[PS] C:\Documents and Settings\Administrators>Add-ADPermission sales -User:'dilip' -ExtendedRights:Send-As -AccessRights:ReadProperty, WriteProperty -Properties:'Personal Information'

This command provides the full access rights for user or users in group which access shared mailbox.

Friday, February 12, 2010

Exchange 2007 New Mailbox Creation

MS Exchange 2007 allows administrator to create new Mailboxes. One can create mailboxes from the ‘Exchange Management Console’. In ‘Exchange Management Console’, there is an option ‘Recipient Configuration’ in given list provided under ‘Microsoft Exchange’. ‘Recipient Configuration’ provides different kind of operations for Exchange 2007 server,
These are,
  • Mailbox
  • Distribution Group
  • Mail Contact
  • Disconnected Mailbox
For creating new Mailbox, one should have to click on ‘Mailbox’ and then click on ‘new Mailbox’.

Exchange server provides different kind of Mailboxes. These are,
  • User Mailbox
  • Room Mailbox
  • Equipment Mailbox
  • Linked Mailbox
For creating new Mailbox, one can select the ‘User Mailbox’ and press next to continue. See Figure 01

Figure 01: This shows the list of Mailboxes

Now, one should select the ‘New User’ option and press next to continue. See Figure 02

Figure 02: This shows the new Mailbox user and existing users.

One should fill up the required info and press the ‘Next’ button to continue. See Figure 03,

Figure 03: This shows the Mailbox user detail

Now, one should need to add the ‘Mailbox database’ for storing the new Mailbox user. After adding the ‘Mailbox database’, one should press ‘Next’ button to continue. See Figure 04,

Figure 04: This shows the Mailbox database selection

Now, one can see the detail information of Mailbox in given Figure 05 below.

Figure 5: This shows the Mailbox user’s attribute

Now, one can the see the Mailbox user in Figure 06 below,

Figure 06: This shows the Mailbox user in Exchange Management Console